Sometimes I think teachers may go overboard with how often they use PowerPoint. Now I am a big PowerPoint fan and have used it ever since it's beginning and the latest PowerPoint is phenomenal, but there are other methods for you and your students to present information, that is engaging, fun, new, different, and just as powerful as PowerPoint.
Today I would like to highlight a tool called "Prezi."
What can you do with it?
3. Once you are logged in click the "New Prezi" button.

4. This will pop open a box. Give your Prezi a title and description and then click the "New Prezi" button.

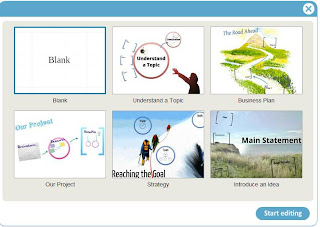
5. Select a template or click the "Blank" box. Using a template might be a good idea for your first Prezi. Once you have chosen, click the "Start Editing" button.
6. Like most presentations starting with a title is a good place to start. Double click anywhere to get started.


Today I would like to highlight a tool called "Prezi."
What can you do with it?
- Present information.
- Embed it in your blog or web page.
- Share it on twitter and Facebook.
- Add video and images to your presentation.
- Change text color, sizes, and fonts.
What are some drawback of Prezi?
- There is a little bit of a learning curve to make them just perfect. Like any piece of software though, the more you use it the easier it will become.
Here is a sample of a Prezi presentation that took me only a few minutes to complete. It isn't as grand as I would make it for my students if I had spent more time with it. At the end of the tutorial I have posted actual student work that turned out great.

3. Once you are logged in click the "New Prezi" button.

5. Select a template or click the "Blank" box. Using a template might be a good idea for your first Prezi. Once you have chosen, click the "Start Editing" button.

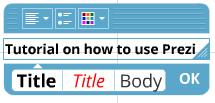
7. Add your title text. You will see icons that you should play with, centering, bulleting, text color, and text style. Once you are satisfied click the "OK" button.
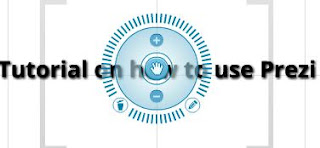
8. Now single click your text and you will get a dial pad looking thing. In the middle you have the "move" tool, above is the zoom in and below is the zoom out. At 5:00 you have the "edit" icon, and at 7:00 you have the delete icon. The reason it looks like a dial is because you can rotate your text. None of the text will be at weird angles when you play your show. The reason you angle text is to add the effect of your whole presentation rotating. It is kind of cool. Play with these tools. When you are ready to move on just find another section of your canvass and click on it to get another text box.

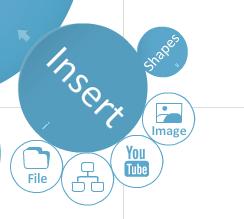
9. Off to the left hand corner you have a bunch of tools.
10. The insert tool allows you to insert shapes, images, youtube videos, files, and flow charts. The cool thing with the image and youtube video options is that you can pull in video and images directly from youtube or google images.
11. The "Frame" tool just give you a frame that allows you to section off the different parts of your presentation.
12. The "Path" tool is where you tell Prezi where each "slide" or the next section of your presentation is. When you click the "Add" button you will then select your title, then then select each individual section of your presentation in the order in which you want to present it.
13. It will kind of look like this when you are done.

14. As you add the the order of each section you will see it on your timeline down at the bottom. You can also change the order from the timeline by left clicking and holding the slide and then just moving it to where you want to.
15. The "Colors and Fonts" is where you can change the look and feel of you whole presentation as it pertains to the Fonts and Colors.

16. Off to the right of the screen is your zoom in and out. This is a very important feature because this is where you can add a layer of depth to your presentation. You can also use your scroll wheel/button on your mouse if it has one.
18. At any time if you want to test your presentation just click the "Show" button.
19. Once you are done with your presentation you can exit it so that you can get to the share options.
20. Once you click the "Exit" button it will take you to your show. From here you can see it as others will see it. Below your show are some buttons, that will allow you to edit and even edit with a partner on another computer, view it with somebody else at the same time, download, save a copy of it or delete it.

21. Off to the right a little bit you have the "Share" buttons. You can Facebook it, Twitter it or even embed it into your webpage or blog, similar to what I did on this page.
22. To embed your presentation click on one of the options and it will bring you to this page. Here you will see a link you can use if you want to share it by emailing it to somebody. But you can click on the "Embed" option to get the embed code.

23. From here you can decide the size you want and then just click the "Copy code to clipboard" button and then paste that code as part of your webpages/blog's html code and it will embed the presentation for you.

That is all there is, which is quite a bit. The best way to learn a program though is to sit down and "play" with it. Have fun with it, and please give this an option to your students the next time the have a presentation as an assignment.
As promised here is a student generated Presi presentation.
No comments:
Post a Comment